Pelican Blog工具特点,静态页面生成速度快,维护简单; 下载最新版 Pelican https://github.com/getpelican/pelican-themes/archive/refs/heads/master.zip. 另外本地应预先安装好Python3.0以上版本,支持Pelican运行; 可通过命令行方式指定版本安装,详细的安装与启动方式参见文档:https://docs.getpelican.com/en/latest/.
uv pip install pelican[markdown]==4.6.0 -i https://pypi.tuna.tsinghua.edu.cn/simple

python3 -m pip install "pelican[markdown]==4.6.0" -i
Pelican简单设置
Article与Page区别
Article:Blog内容,指具体写五Blog文章内容 Page:通常指固定不变的内容页面,比较个人说明内容; `
元数据:
指用于定义博客,进行搜索引擎优化的设置,如Blog的基本信息,可用Markdown语言来编辑Blog内容,格式如下: - 多个标签或作者,可以用逗号做分割 - 多个作者使用authers - 仅一个作者使用auther - modified值是最后编辑文章的时间,默认和date相同。可以通过modified进行RSS推送,可在刚写文章的时候RSS已经推送了一遍,后来进行了修改,就可以通过modified进行再次推送。
Title:
Date: 2021-07-12 14:25
Modified: 2021-07-15 19:30
Category: Tech
Tags: Python,Blog,
Slug: Howto-supet-blog-with-Python-and-Github
Author: 工长

Blog的Article页面内容部分
页面
在content下面创建了目录pages,该目录下所有的文件都将被生成静态页面,比如About和Contact页面。
可以通过设置DISPLAY_PAGES_ON_MENU来控制页面是否在导航栏显示,默认情况是True
如果希望页面不在导航条上显示,可以在页面的元数据里面添加:status: hidden属性,例如对于404页面设置为不可见,因为404静态页面通常是不希望在导航条上面显示的。
引用内部Article的链接 可以通过content的目录结构在不同的文章之间进行链接,现实文章的引用操作。 引用content里面的内容语法是:
{filename}path/to/file # {fielname}是必填内容,可以同时支持Linux和windows
markdonw格式下样例如下:

[a link relative to the current file]({filename}category/article1.rst)
[a link relative to the content root]({filename}/category/article1.rst)
链接静态文件 需要引用到的静态资源,比如图片,PDF文件等,需要在pelicanconf.py中配置STATIC_PATHS属性,Pelican默认设置content下的images为图片资源,其他的资源需要进行配置。 创建Article页面时,Pelican会将图片复制到output/images/目录下,将pdf复制到output/pdfs/目录下,同时将链接适配到Article文件中
STATIC_PATHS = ['images', 'pdfs']
发布草稿
对部分Article希望作为草稿先发布出来看下效果,不让Article在首页和分类列表里面显示出来,可以在文章中添加Status: draft属性。修改文章的配置为Status: published将文章正式发布出来。
如果将所有刚写好的文章都作为草搞件发布的话,可以在配置文件中配置DEFAULT_METADATA 属性
DEFAULT_METADATA = {
        'status': 'draft',
}
文章在发布的时候默认均为草稿,通过修改文章的配置为Status: published将文章正式发布。
本地启动
pelican -l
配置文件
pelicanconf.py是在pelican主目录下的配置文件,可以通过修改配置文件的方式,调整Blog的设置常用配置如下所示。
#!/usr/bin/env python
# -*- coding: utf-8 -*- #
AUTHOR = '工长'
SITENAME = '自在工坊'
SITESUBTITLE='走在代码边缘'
#--- development stage ----------------
# SITEURL = 'http://localhost:8000'
# LOAD_CONTENT_CACHE = False
# Uncomment following line if you want document-relative URLs when developing
# RELATIVE_URLS = True
#------ production stage ------------------

SITEURL = 'https://www.kovlala.fun'
RELATIVE_URLS = False
TIMEZONE = 'Asia/Hong_Kong'
# SIDEBAR_DIGEST = '运营数据分析中'
PATH = '/Users/Documents/content.blog/'

ARTICLE_PATHS = ['blogs.live']
ARTICLE_SAVE_AS = '{date:%Y}/{date:%m}/{slug}.html'
ARTICLE_URL = '{date:%Y}/{date:%m}/{slug}.html'

# FAVICON_FILENAME='images/Logo32x32.png'
SUMMARY_MAX_LENGTH = 20
SUMMARY_END_SUFFIX = '…'

STATIC_PATHS=['images','downloads','CNAME','robots.txt']
DISPLAY_CATEGORIES_ON_MENU = False

MENUITEMS = (('Blog', 'https://www.kovlala.fun'),('Tech', '/category/tech.html'),)

#FEED_ALL_RSS = 'feeds/all.rss.xml'

DEFAULT_LANG = 'zh_CN'
BIND = '0.0.0.0'
#BIND = '127.0.0.1'
# Feed generation is usually not desired when developing
FEED_ALL_ATOM = None
CATEGORY_FEED_ATOM = None
TRANSLATION_FEED_ATOM = None
AUTHOR_FEED_ATOM = None
AUTHOR_FEED_RSS = None

# Blogroll
LINKS = (('Pelican', 'https://getpelican.com/'),
('Python.org', 'https://www.python.org/'),
('Jinja2', 'https://palletsprojects.com/p/jinja/'),)


# Social widget
#SOCIAL = (('First social link ', '#'),
# ('Another social link', '#'),)

DEFAULT_PAGINATION = 10
THEME = 'pelican-themes/pelican-octopress'
DISQUS_SITENAME = 'kovlala'
SHOW_DISQUS_COMMENT_COUNT = False # True
GOOGLE_ANALYTICS = "XXX"

# settings.py for SEO Setting: https://github.com/pelican-plugins/seo
SEO_REPORT = True # To enable this feature
SEO_ENHANCER = False # To disable this feature
SEO_ENHANCER_OPEN_GRAPH = False # The default value for this feature
SEO_ENHANCER_TWITTER_CARDS = False # The default value for this feature
主题修改
通过修改pelicanconfig.py文件中主题的目录,指定主题
THEME = '你的主题所在目录'
例如:
THEME = '/Users/root/Documents/blog/tuxlite_tbs'
时间格式
DEFAULT_DATE_FORMAT = '%Y-%m-%d'
社交账号
SOCIAL = (('github', 'https://github.com/XXX'),
          ('Twitter', 'http://www.twitter.com/XXXX'))
评论功能
开通评论功能,可以在Disqus上申请一个站点,在pelicanconf.py中替换shortname
DISQUS_SITENAME = 'shortname'
简单的SEO
在output文件夹中建立robots.txt,允许所有爬虫,不允许爬取theme目录下的内容,不允许所有的图片,内容如下:
User-agent: *
Disallow: /theme/
Disallow: /.gif$
Disallow: /.png$
Disallow: /.jpg$
Google的GA分析
GOOGLE_ANALYTICS = '跟踪ID' #GA申请
增添插件
git clone git://github.com/getpelican/pelican-plugins.git 将插件文件下载到本地目标,修改pelicanconf.py文件如下
PLUGIN_PATH = u"pelican-plugins"
PLUGINS = ["sitemap"]
SITEMAP = {
    "format": "xml",
    "priorities": {
        "articles": 0.7,
        "indexes": 0.5,
        "pages": 0.3,
    },
    "changefreqs": {
        "articles": "monthly",
        "indexes": "daily",
        "pages": "monthly",
    }
}
favicon.ico
将此文件放在output的根目录下即可
添加订阅
pelican的库包含了feedgenerator, 可以用来生成Atom feeds, 即包含博客数据的xml文件,用于订阅,只需在pelicanconf.py加入;国内用订阅的习惯一般,这个功能没有实际使用过。
FEED_ALL_RSS = 'feeds/all.rss.xml
其它定制化设置
独立域名,在Github后台与域名管理后台设置 CName文件,域名管理后台设置;
Pelican Blog 内容自动发布Github
Github上发布,后续维护成本可忽略不计;个人建立的VPS中发布,如仅针对一人Blog,显然成本占用的维护精力比较大,综合考虑通过Github发布是最优选择。
建立两个repo 1 私有repo,用于保存每次新添加的源文件后通过Pelican生产的新Article/Post 2 公有repo,对外提供内容的publish服务,可绑定域名对接访问; 3 私有repo中建立Action,通过Push触发,将指定内容复制到公有repo中,完成自动发布;
本机新加入或编辑Article/Post的内容后,通过使用git发布:
$ pelican content # 更新content内容
$ git add . # git添加
$ git commit -am 'update'   # 加入注释内容
$ git push  # 向私有repo中Push更新的内容
$ 根据系统提示,录入key完成更新
自动发布,通过Action自动完成从内容源与发布版本的文件传输,约3-5分钟后线上内容完成更新,以下样例工作正常,可根据实际变化调整;
# This is a basic workflow to help you get started with Actions
name: CI-Publish Blog
# Controls when the workflow will run
on:
# Triggers the workflow on push or pull request events but only for the main branch
push:
branches: [ main ]
pull_request:
branches: [ main ]
# Allows you to run this workflow manually from the Actions tab
workflow_dispatch:
# A workflow run is made up of one or more jobs that can run sequentially or in parallel
jobs:
# This workflow contains a single job called "build"
# Secodn job called "publish"
publish:
runs-on: ubuntu-latest
steps:
- uses: actions/checkout@v2
with:
submodules: true
#- name: Set up Python
# uses: actions/setup-python@v1
# with:
# python-version: '3.8'
#- name: Insall dependencies
# run: pip install -r requirements.txt
- name: Pushes to another repository
uses: cpina/github-action-push-to-another-repository@main # 关键点,自用Github提供的大牛们写好的Action
env:
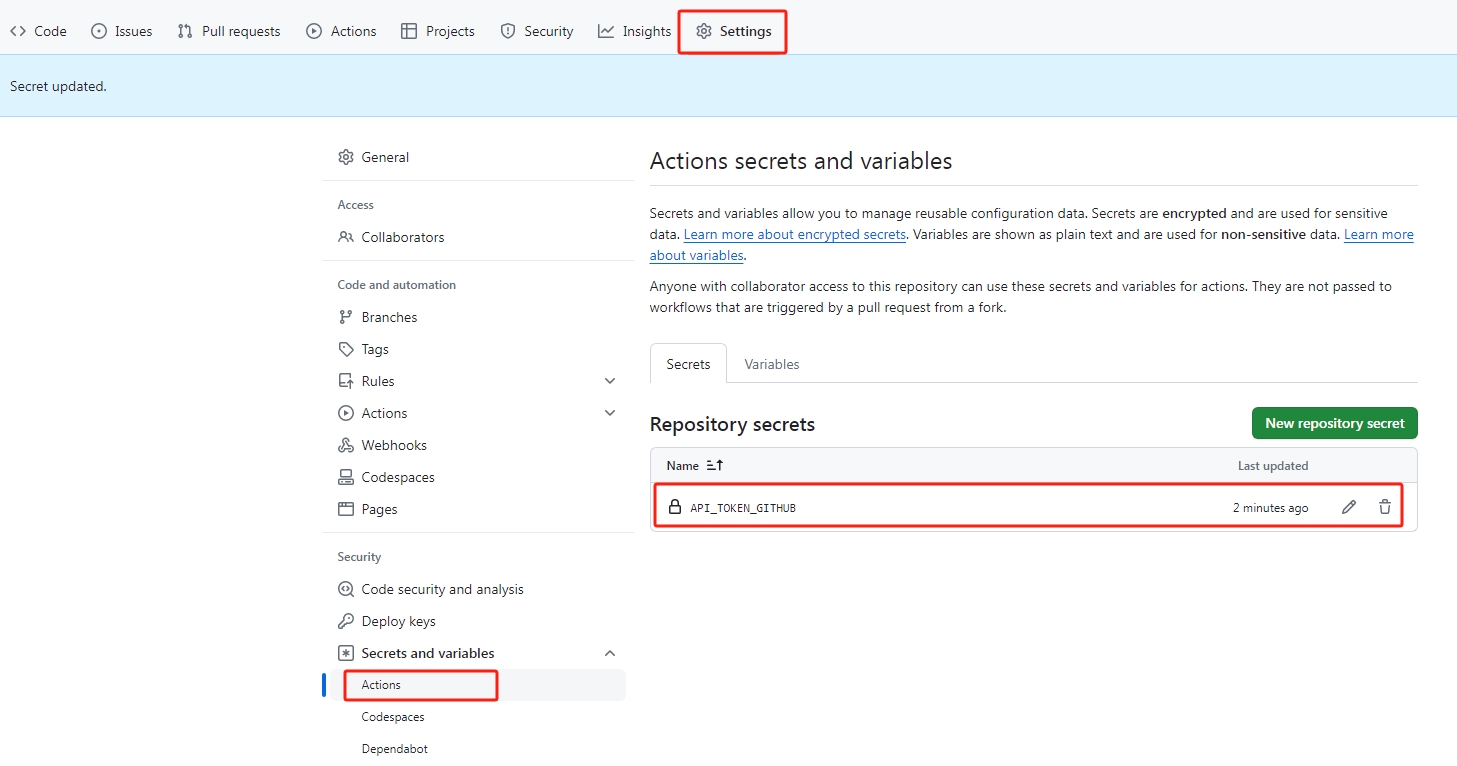
API_TOKEN_GITHUB: ${{ secrets.API_TOKEN_GITHUB }} # API_TOKEN_GITHUB, 在当前做为源Repo中的Setting中设置API_TOKEN_GITHUB,本处将自动引用;注意生成或修改时会录入"Personal access tokens",该token需求提前设置好.
with:
source-directory: 'output'
destination-github-username: 'guthub name XXXXXXX' # github用户名
destination-repository-name: 'namen of repository for publlish' # 目标Repo,即对外发布用的Repo
user-email: XXXXXXXX@XXXXXXXX # github email
commit-message: Post
target-branch: master
API_TOKEN_GITHUB的设置入口如图示;
output目录下加入CNAME文件,内容为定制化的域名(Custom Domain),否则每次push后,会修改为Github repo默认的URL进行访问。
错误处理
pelican content

Traceback (most recent call last):
  File "D:\Program Files (x86)\Python\Python37\lib\runpy.py", line 193, in _run_module_as_main
    "__main__", mod_spec)
  File "D:\Program Files (x86)\Python\Python37\lib\runpy.py", line 85, in _run_code
    exec(code, run_globals)
  File "D:\Program Files (x86)\Python\Python37\Scripts\pelican.exe\__main__.py", line 5, in <module>
  File "D:\Program Files (x86)\Python\Python37\lib\site-packages\pelican\__init__.py", line 19, in <module>
    from pelican.generators import (ArticlesGenerator,  # noqa: I100
  File "D:\Program Files (x86)\Python\Python37\lib\site-packages\pelican\generators.py", line 17, in <module>
    from pelican.readers import Readers
  File "D:\Program Files (x86)\Python\Python37\lib\site-packages\pelican\readers.py", line 23, in <module>
    from markdown import Markdown
  File "D:\Program Files (x86)\Python\Python37\lib\site-packages\markdown\__init__.py", line 29, in <module>
    from .core import Markdown, markdown, markdownFromFile  # noqa: E402
  File "D:\Program Files (x86)\Python\Python37\lib\site-packages\markdown\core.py", line 26, in <module>
    from . import util
  File "D:\Program Files (x86)\Python\Python37\lib\site-packages\markdown\util.py", line 87, in <module>
    INSTALLED_EXTENSIONS = metadata.entry_points().get('markdown.extensions', ())
AttributeError: 'EntryPoints' object has no attribute 'get'
检查运行python环境中importlib-metadata库的版本为6.6.0;其它模块升级后引起的版本不兼容问题,重新安装低版本importlib-metadata即可;尝试了5.0.0版本,兼容问题依旧,更改为importlib-metadata=4.13.0解决。
pip list | findstr "importlib"
importlib-metadata        6.6.0
importlib-resources       5.4.0

更新
pip install importlib-metadata==4.13.0
Links:
- https://github.com/look4wine/pelican-octopress-theme
- https://github.com/getpelican/pelican-themes
- https://segmentfault.com/a/1190000021815477
- https://github.com/cpina/github-action-push-to-another-repository#github-action-push-to-another-repository
- https://cbrunet.net/automatic-page-publication-from-pelican-to-github-pages.html
- https://posts.careerengine.us/p/5e855166b01669120613281d?nav=post_newest&p=5da286c3b7f3c83f5c21b7df
- https://cbrunet.net/automatic-page-publication-from-pelican-to-github-pages.html